Tuesday, 23 December 2008

Christmas Past


Looking through my Christmas tree ornaments there were lots of memories of Christmas decorations I had made in years past. The star was one I made at an evening class, it seemed to take forever but it was OK once it was finished. The bauble was one of my firstbobbin lace pieces, fairly quick to make and used Guterman red and green variagated machine sewing thread which is no longer available. The last one I expect many of you recognise, this is a Christine Springett kit, I have made this a couple of times as it is nice to add to a Christmas Card. But shock horror I couldn't find any tatted ornaments, well it is too late for this year so I will search out a nice snowflake pattern and put it on my to do list for next Christmas.

Monday, 8 December 2008

Tatted Christmas Trees

If you have read my profile you will know that one of my other hobbies is tatting. I learned to tat about 15 years ago and made a few bits and pieces, but then for one reason or another didn't touch it for several years. About 18months ago I discovered Here-Be-Tatters a yahoo group, and since then I have been thoroughly enjoying myself downloading free patterns galore. There are so many talented tatters who give their patterns freely I shall never live long enough to reproduce them all.


One of my favourite designers is Jane Eborall. Back in May of this year I took part in Jane's TIAS (Tat It And See) challenge. http://tatitandsee.blogspot.com/2008/06/wednesday-and-more-completed.html I had never added beads to any of my tatting, and don't think I would have attempted it without the encouragement and comaradie that was shown during the 10 days that the challenge took place. My lady was the result doesn't she look grand.


Then around August time Jane showed a wonderful beaded tatted Christmas Tree and asked if anyone could guess the order of the tatting. Having enjoyed creating the tatted lady so much I sent her an email with my guess. I was wrong but she very kindly sent me the pattern to test tat it and once again I rose to the challenge. The result is the middle one of the 5 below (the one with the odd star at the top of it). They look a lot better since I have stiffened them with water soluable fabric which I dissolved in a jar of warm water then painted on. Since this time Jane has offered the pattern on her website http://janeeborall.blogspot.com/ . I have managed to obtain some decent stars and backing pins so recently, over the period of several evenings I tatted Christmas trees. I made them into brooches and intend to attach them to blank Christmas cards to send to my special friends and relatives.
I am very pleased with the results and hope my friends and relatives will be too.

Crazy Christmas Quilting

Members of the UK Embroiderers Guild Forum organised a Christmas swap, which is always great fun. Those taking part offered to make an ornament and Christmas card for their partner. I spent quite a while trying to decide the best design to use. Originally I made a traditional bauble design but was not happy with the result. Then it occurred to me that as my partner's name began with the letter 'J' and my name also begins with 'J' I thought it would be appropriate to make a Christmas stocking which is similar in shape. Having decided on the shape the next question was what technique? Having made a start on my crazy quilting square (see previous post) I had a few scraps left over which were ideal for my stocking. This is the result. It was a nice and easy project and reasonably quick to complete once I had made a few decisions on the best way to assemble it.
The next challenge was to do the Christmas card, for this I decided to copy the stocking idea. I photographed the stocking and adjusted the image in paint shop pro. I then reproduced the design several times in a word document and printed it on to inkjet fabric through the printer. I ironed the designs on to bondaweb, cut out the design and pressed it on to some glittery felt and machine stitched around the outline. I then stitched a few beads on to each stocking and glued it to a blank card and hey presto a matching Christmas card to go with the ornament and several other cards to send to friends. I hope the recipient of my stocking will be pleased with it.

Saturday, 29 November 2008


A few months ago there was a discussion on the tatting group I am in called Here-Be-Tatters about what to do with all the tatting pieces that we start but don't finish because of an error etc. It was suggested that we make a crazy quilted square and add our tatted pieces to it, and a challenge was born. Sue Hanson our list mom at the time offered to supply anyone interested with a bundle of fabrics. Well anyone who knows me will know that I just could not resist an offer like this. The fabulous bundle of fabrics duly arrived together with ribbons, threads and beads, all colour coordinated. Scrummy! This is as far as I have got with the quilted square, the tatting is pinned in place and I will add the embroidery over the coming weeks. I intend to make a tote bag and add the finished square to one side.

This is going to be on the other side of the bag. I couldn't resist making some more of my fabric with the scraps left over from the quilt square. It is my contribution to recycling. At my guild meeting last night I was lucky to purchase some edging strip to hide the edges and which will coordinate perfectly with this fabric.

Thursday, 9 October 2008


Mary Corbet on http://www.needlenthread.com/ is asking what project gave us the most pleasure and why. Well I can honestly say without hesitation the piece that has given me the most pleasure and continues to do so is the pulled thread whitework doily I did in my evening class with Anne Hills. I loved every minute of making it and could barely put it down while I was making it. I stitched on it every spare minute. It only took me about 3 weeks from start to finish. Anne helped me with some of the stitches as she had already made the piece and had started on a whole tablecloth in the same style! Anne died not long afterwards so it has wonderful memories for me of a very dedicated and caring tutor. I wonder where that tablecloth is now.

Wednesday, 3 September 2008


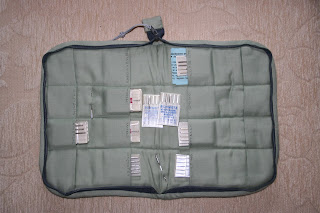
This is another fabric I made at a Lesley George workshop. It is very basic leaf shapes cut out and laid on to a piece of calico and stitched down using the machine's inbuilt stitch patterns. Once I felt I had stitched into it enough I turned it over and did vermicelli bobbin work to create a bit of texture. I love this fabric and have used it several times. The item on the right of the picture is a folder I made to hold all the different type of machine needles. The inside is shown below. If I made it again I would modify the inside by adding elastic to the pockets to stop the needle packets falling out. They don't fall far because it has a zipper all the way round the outside but it can be a bit annoying when some of the packets fall out of their little pockets.

Monday, 1 September 2008


I used to go to evening classes at http://www.lesleygeorge.co.uk/ One of the projects I completed as a result of the fabric manipulation idea in the previous post was to create this cushion. I had no pattern for this it just evolved over several weeks. The velvet centre Fleur-de-lys was created using machine trapunto. The trim around the edge of the velvet is free machine embroidery stitched on stockings. The stripey trim is just a length of Kumihimo made on my hand loom. The tassels at each end took me forever to make because I really didn't know what I was doing I just knew what I wanted to achieve. I consulted Anna Crutchley's Tassel Making book extensively and I am quite pleased with the result. This cushion was displayed in our local Embroiderers' Guild exhibition a couple of years ago.


I was chatting via email with a friend from Australia (hi Elizabeth) and when I told her I had started a blog she wanted to take a look so I thought I had better start posting something for her to look at :-) A lot of work I have done has never been photographed. I haven't done city and guilds or had a need to record my work in any way so there didn't seem to be any point. Yesterday I had a bit of a photographing session and I discovered a curious thing about myself; I seem to have a passion for making fabric. Let me show you what I mean.
This piece was created by tearing strips of dyed calico and then stitching it together using the sewing machine's inbuilt stitch patterns. The leaves were a digitised pattern purchased from Birdhouse Cottage Crafts at http://www.secretsof.com/content/463

Friday, 8 August 2008

For some while now I have been viewing other peoples blogs. I have found it interesting to see the progression of their experience of a particular technique or the progress of a particular project. With this in mind I have decided to start my own blog to record my feeble efforts with my crafts. My comments and images will be here as the days and weeks go by so that I can mark my own progress ,if at all. As I gain experience I will add links to blogs and websites I have found interesting. If you have chanced upon this blog I hope you will find something useful eventually and if so I would be interested to read your comments.

For now I am pleased that I have managed to post this while the date is still lucky 08.08.08. I will add some pictures of my work later.